stunnel is an open source software that provides SSL/TLS tunneling. This is especially useful when it comes to protect existing client-server communications that do not provide any encryption at all. Another application is to avoid exposing many services and make all of them pass through the tunnel and, therefore, securing all the traffic at the same time.
And because I have a WR703N with an OpenVPN server installed, I decided to set up stunnel and give it a try. The advantage over using my existing VPN, under certain circumstances, is that the establishment of the secure tunnel looks pretty much like a normal connection to an HTTPS website so most of the networks/proxys will allow this traffic whilst the VPN might be blocked (especially if UDP is used). So, the OpenVPN+stunnel combo looks like a pretty good security solution to be installed on our OpenWRT device.
The way I have the stunnel service configured is using MTLS (client and server authentication) and allowing only TLSv1.2 protocol. These are the specific lines in the stunnel.conf (server side):
; protocol version (all, SSLv2, SSLv3, TLSv1)
sslVersion = all
options = CIPHER_SERVER_PREFERENCE
options = NO_SSLv2
options = NO_SSLv3
options = NO_TLSv1
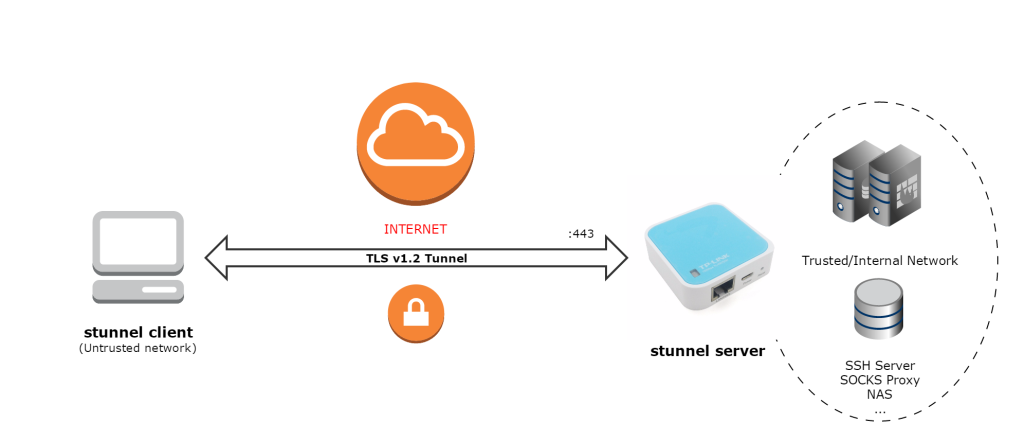
Just for testing, I have installed stunnel on a Windows box and configured it as a client (with a client certificate signed by the same CA as the server) and connections to server port 443 will be forwarded to the SSH service running on the server side. This would allow us to SSH our server without
needing to expose it and, for example, set up a SOCKS proxy and browse the internet securely through the tunnel.
Client side:
[https]
accept  = 22
protocol = connect
connect = proxy:8080
protocolHost= server:443
Server side:
[https]
accept  = 443
connect = 22
TIMEOUTclose = 0
On the client side, simply SSH localhost on the configured port (22) and stunnel will intercept this connection and establish a TLS tunnel with the server to the SSH service running on it.
These are the logs on the client side when SSH’ing localhost:
2016.07.20 21:37:09 LOG7[12]: Service [https] started
2016.07.20 21:37:09 LOG5[12]: Service [https] accepted connection from 127.0.0.1:43858
2016.07.20 21:37:09 LOG6[12]: s_connect: connecting proxy:8080
2016.07.20 21:37:09 LOG7[12]: s_connect: s_poll_wait proxy:8080: waiting 10 seconds
2016.07.20 21:37:09 LOG5[12]: s_connect: connected proxy:8080
2016.07.20 21:37:09 LOG5[12]: Service [https] connected remote server from x.x.x.x:43859
2016.07.20 21:37:09 LOG7[12]: Remote descriptor (FD=732) initialized
2016.07.20 21:37:09 LOG7[12]:  -> CONNECT server:443 HTTP/1.1
2016.07.20 21:37:09 LOG7[12]:  -> Host: server:443
2016.07.20 21:37:09 LOG7[12]:  -> Proxy-Authorization: basic **
2016.07.20 21:37:09 LOG7[12]:  ->
2016.07.20 21:37:09 LOG7[12]:  <- HTTP/1.1 200 Connection established
2016.07.20 21:37:09 LOG6[12]: CONNECT request accepted
2016.07.20 21:37:09 LOG7[12]:  <-
2016.07.20 21:37:09 LOG6[12]: SNI: sending servername: server
2016.07.20 21:37:09 LOG7[12]: SSL state (connect): before/connect initialization
2016.07.20 21:37:09 LOG7[12]: SSL state (connect): SSLv3 write client hello A
2016.07.20 21:37:11 LOG7[12]: SSL state (connect): SSLv3 read server hello A
2016.07.20 21:37:11 LOG7[12]: Verification started at depth=1: C=ES, ST=M, O=O, CN=wrtServer
2016.07.20 21:37:11 LOG7[12]: CERT: Pre-verification succeeded
2016.07.20 21:37:11 LOG6[12]: Certificate accepted at depth=1: C=ES, ST=M, O=O, CN=wrtServer
2016.07.20 21:37:11 LOG7[12]: Verification started at depth=0: C=ES, ST=S, O=O, CN=wrtClient
2016.07.20 21:37:11 LOG7[12]: CERT: Pre-verification succeeded
2016.07.20 21:37:11 LOG5[12]: Certificate accepted at depth=0: C=ES, ST=S, O=O, CN=wrtClient
2016.07.20 21:37:11 LOG7[12]: SSL state (connect): SSLv3 read server certificate A
2016.07.20 21:37:11 LOG7[12]: SSL state (connect): SSLv3 read server key exchange A
2016.07.20 21:37:11 LOG6[12]: Client CA: C=ES, ST=M, O=O, CN=wrtCA
2016.07.20 21:37:11 LOG7[12]: SSL state (connect): SSLv3 read server certificate request A
2016.07.20 21:37:11 LOG7[12]: SSL state (connect): SSLv3 read server done A
2016.07.20 21:37:11 LOG7[12]: SSL state (connect): SSLv3 write client certificate A
2016.07.20 21:37:11 LOG7[12]: SSL state (connect): SSLv3 write client key exchange A
2016.07.20 21:37:11 LOG7[12]: SSL state (connect): SSLv3 write certificate verify A
2016.07.20 21:37:11 LOG7[12]: SSL state (connect): SSLv3 write change cipher spec A
2016.07.20 21:37:11 LOG7[12]: SSL state (connect): SSLv3 write finished A
2016.07.20 21:37:11 LOG7[12]: SSL state (connect): SSLv3 flush data
2016.07.20 21:37:11 LOG7[12]: SSL state (connect): SSLv3 read server session ticket A
2016.07.20 21:37:11 LOG7[12]: SSL state (connect): SSLv3 read finished A
2016.07.20 21:37:11 LOG7[12]:      8 client connect(s) requested
2016.07.20 21:37:11 LOG7[12]:      7 client connect(s) succeeded
2016.07.20 21:37:11 LOG7[12]:      0 client renegotiation(s) requested
2016.07.20 21:37:11 LOG7[12]:      2 session reuse(s)
2016.07.20 21:37:11 LOG6[12]: SSL connected: new session negotiated
2016.07.20 21:37:11 LOG7[12]: Deallocating application specific data for addr index
2016.07.20 21:37:11 LOG6[12]: Negotiated TLSv1.2 ciphersuite ECDHE-RSA-AES256-GCM-SHA384 (256-bit encryption)
As you can see, the traffic will be routed through a TLSv1.2 channel encrypted with AES256 in GCM mode and the session key has been derived using ephimeral ECDH, with Perfect Forward Secrecy so the traffic will be fairly well protected, at least, up to the stunnel server.
Make sure to keep an eye on the vulnerabilities listed on the stunnel website and have the server properly patched.