The purpose of this post is explaining the low level details of how trunking works in OVN. A typical use case of trunk ports could be the use of nested VMs or containers inside VMs; where all the traffic is directed to the vNIC of the virtual machine and then forwarded to the right container based on their VLAN ID. For more context around the feature and use cases, please check out the OpenStack documentation guide.
Let’s take a very simple topology for our deep dive. You can also deploy it in your machine using this vagrant setup and replay the commands as we go 🙂
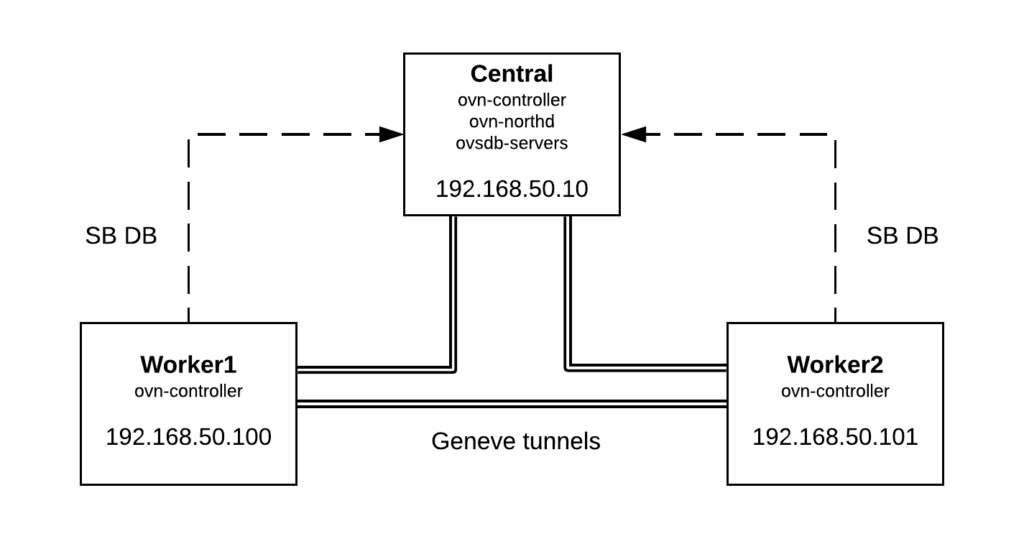
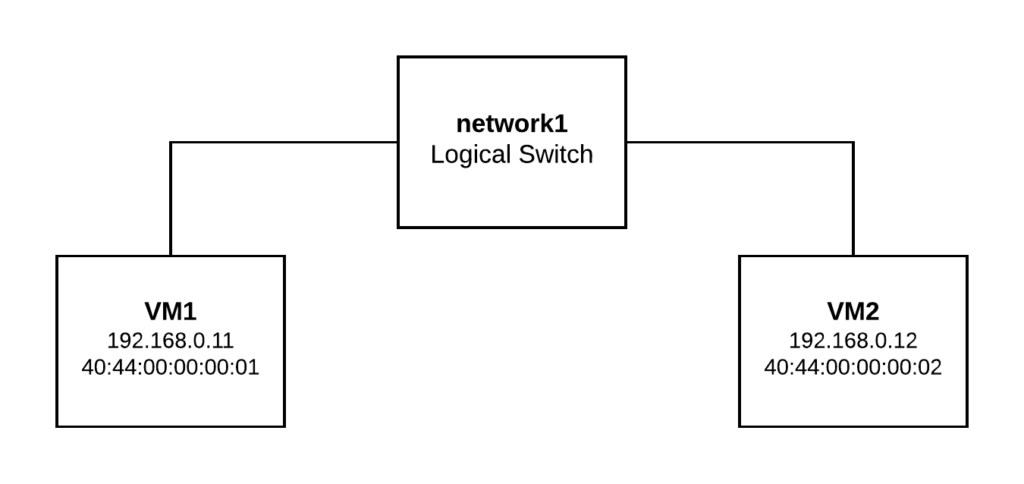
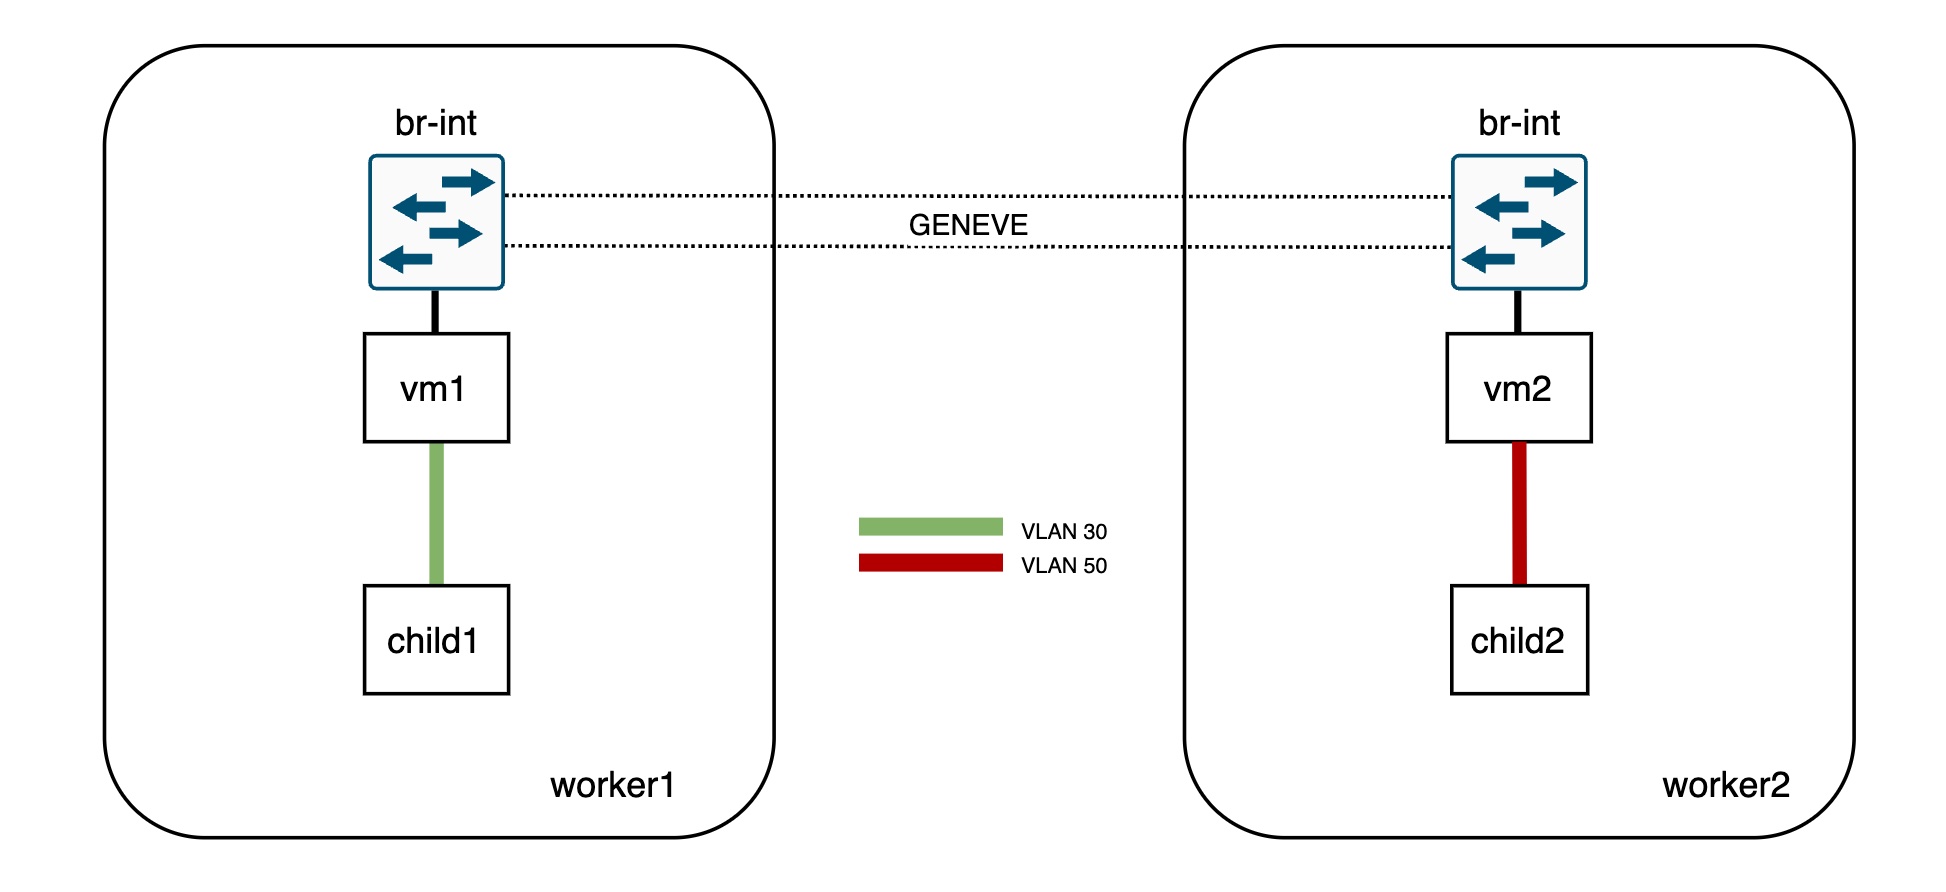
 This sample setup has two Logical Switches and two ports on each of them. The physical layout is as follows:
- vm1 bound to worker1
- vm2 bound to worker2
- child1 (VLAN 30) inside vm1
- child2 (VLAN 50) inside vm2
Let’s quickly check the OVN databases info:
[root@central vagrant]# ovn-nbctl show
switch db4e7781-370c-4439-becd-35803c0e3f12 (network1)
    port vm1
        addresses: ["40:44:00:00:00:01 192.168.0.11"]
    port vm2
        addresses: ["40:44:00:00:00:02 192.168.0.12"]
switch 40ac144b-a32a-4202-bce2-3329f8f3e98f (network2)
    port child1
        parent: vm1
        tag: 30
        addresses: ["40:44:00:00:00:03 192.168.1.13"]
    port child2
        parent: vm2
        tag: 50
        addresses: ["40:44:00:00:00:04 192.168.1.14"]


[root@central vagrant]# ovn-sbctl show
Chassis worker2
    hostname: worker2
    Encap geneve
        ip: "192.168.50.101"
[root@central vagrant]# ovn-sbctl show
Chassis worker2
    hostname: worker2
    Encap geneve
        ip: "192.168.50.101"
        options: {csum="true"}
    Port_Binding child2
    Port_Binding vm2
Chassis worker1
    hostname: worker1
    Encap geneve
        ip: "192.168.50.100"
        options: {csum="true"}
    Port_Binding child1
    Port_Binding vm1
Instead of booting actual VMs and containers, I simulated it with network namespaces and VLAN devices inside them:
[root@worker1 vagrant]# ip netns exec vm1 ip -d link show
1: lo: <LOOPBACK> mtu 65536 qdisc noop state DOWN mode DEFAULT group default qlen 1000
    link/loopback 00:00:00:00:00:00 brd 00:00:00:00:00:00 promiscuity 0 addrgenmode eui64 numtxqueues 1 numrxqueues 1 gso_max_size 65536 gso_max_segs 65535
2: child1@vm1: <BROADCAST,MULTICAST,UP,LOWER_UP> mtu 1500 qdisc noqueue state UP mode DEFAULT group default qlen 1000
    link/ether 40:44:00:00:00:03 brd ff:ff:ff:ff:ff:ff promiscuity 0
    vlan protocol 802.1Q id 30 <REORDER_HDR> addrgenmode eui64 numtxqueues 1 numrxqueues 1 gso_max_size 65536 gso_max_segs 65535
24: vm1: <BROADCAST,MULTICAST,UP,LOWER_UP> mtu 1500 qdisc noqueue state UNKNOWN mode DEFAULT group default qlen 1000
    link/ether 40:44:00:00:00:01 brd ff:ff:ff:ff:ff:ff promiscuity 2
    openvswitch addrgenmode eui64 numtxqueues 1 numrxqueues 1 gso_max_size 65536 gso_max_segs 65535


[root@worker2 vagrant]# ip netns exec vm2 ip -d link show
1: lo: <LOOPBACK> mtu 65536 qdisc noop state DOWN mode DEFAULT group default qlen 1000
    link/loopback 00:00:00:00:00:00 brd 00:00:00:00:00:00 promiscuity 0 addrgenmode eui64 numtxqueues 1 numrxqueues 1 gso_max_size 65536 gso_max_segs 65535
2: child2@vm2: <BROADCAST,MULTICAST,UP,LOWER_UP> mtu 1500 qdisc noqueue state UP mode DEFAULT group default qlen 1000
    link/ether 40:44:00:00:00:04 brd ff:ff:ff:ff:ff:ff promiscuity 0
    vlan protocol 802.1Q id 50 <REORDER_HDR> addrgenmode eui64 numtxqueues 1 numrxqueues 1 gso_max_size 65536 gso_max_segs 65535
15: vm2: <BROADCAST,MULTICAST,UP,LOWER_UP> mtu 1500 qdisc noqueue state UNKNOWN mode DEFAULT group default qlen 1000
    link/ether 40:44:00:00:00:02 brd ff:ff:ff:ff:ff:ff promiscuity 2
    openvswitch addrgenmode eui64 numtxqueues 1 numrxqueues 1 gso_max_size 65536 gso_max_segs 65535
Now, as you can see, none of the subports (child1 and child2) are connected directly to the integration bridge so both vm1 and vm2 ports act as trunk ports for VLAN IDs 30 and 50. OVN will install flows to tag/untag the traffic directed to/from these ports.
Traffic and OpenFlow analysis
To illustrate this, let’s ping from child1 (worker1) to child 2 (worker2):
[root@worker1 vagrant]# ip netns exec vm1 ping 192.168.1.14
PING 192.168.1.14 (192.168.1.14) 56(84) bytes of data.
64 bytes from 192.168.1.14: icmp_seq=21 ttl=64 time=0.824 ms
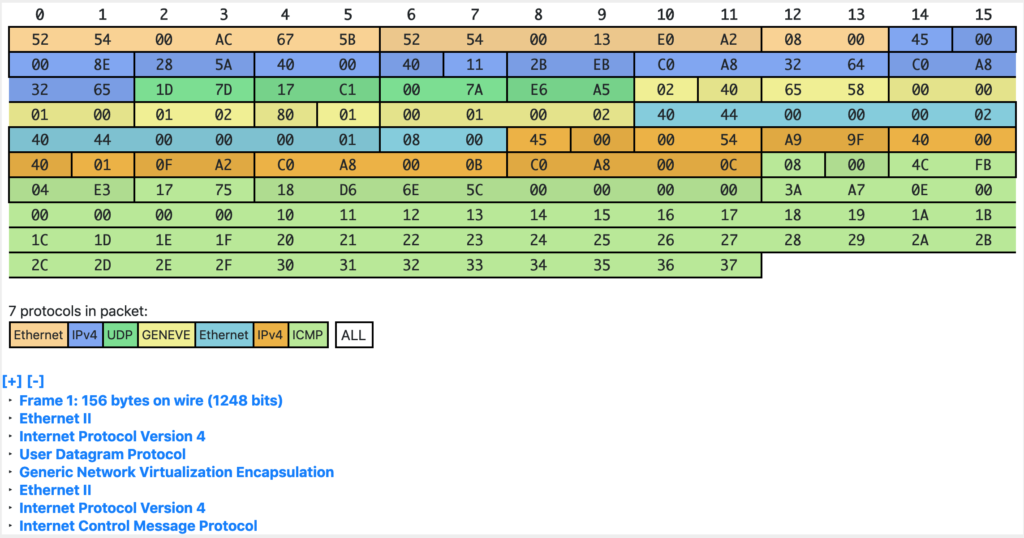
64 bytes from 192.168.1.14: icmp_seq=22 ttl=64 time=0.211 msThe traffic will arrive tagged to the vm1 interface and will be sent out untagged to worker2 (where vm2 is bound) via the Geneve tunnel:
[root@worker1 ~]# ip netns exec vm1 tcpdump -vvnee -i vm1 icmp -c1

tcpdump: listening on vm1, link-type EN10MB (Ethernet), capture size 262144 bytes
13:18:16.980650 40:44:00:00:00:03 > 40:44:00:00:00:04, ethertype 802.1Q (0x8100), length 102: vlan 30, p 0, ethertype IPv4, (tos 0x0, ttl 64, id 55255, offset 0, flags [DF], proto ICMP (1), length 84)
    192.168.1.13 > 192.168.1.14: ICMP echo request, id 9833, seq 176, length 64


[root@worker1 ~]# tcpdump -vvneei genev_sys_6081 icmp -c1

tcpdump: listening on genev_sys_6081, link-type EN10MB (Ethernet), capture size 262144 bytes
13:19:11.980671 40:44:00:00:00:03 > 40:44:00:00:00:04, ethertype IPv4 (0x0800), length 98: (tos 0x0, ttl 64, id 16226, offset 0, flags [DF], proto ICMP (1), length 84)
    192.168.1.13 > 192.168.1.14: ICMP echo request, id 9833, seq 231, length 64
On worker1, let’s inspect the OVS flows that determine the source network/port based on the VLAN ID:
[root@worker1 ~]# ovs-ofctl dump-flows br-int table=0 |grep vlan

 cookie=0x4b8d6fa5, duration=337116.380s, table=0, n_packets=270983, n_bytes=27165634, idle_age=0, hard_age=65534, priority=150,in_port=12,dl_vlan=30 actions=load:0x1->NXM_NX_REG10[5],strip_vlan,load:0x5->NXM_NX_REG13[],load:0x1->NXM_NX_REG11[],load:0x2->NXM_NX_REG12[],load:0x2->OXM_OF_METADATA[],load:0x1->NXM_NX_REG14[],resubmit(,8)
The flow above in table 0 matches on the VLAN tag (dl_vlan=30). Also, note that there’s no matching flow for VLAN 50 as vm2 is not bound to worker1.
As each parent should have subports with unique VLAN IDs, this ID will determine the source port (nested VM or container) that is sending the traffic. In our example, this will be child1 as it is the subport tagged with VLAN 30. In the actions section of the table 0 flow, the packet will be untagged (strip_vlan action), and the relevant registers will be populated to identify both the subport network and the logical input port:
- The packet is coming from OF port 12 (in_port=12) which corresponds to vm1
[root@worker1 ~]# ovs-ofctl show br-int | grep vm1
12(vm1): addr:40:44:00:00:00:01- The network identifier (metadata) is populated with the value 2 (load:0x2->OXM_OF_METADATA[]) which corresponds to the network of the subport (network2)
[root@central ~]# ovn-sbctl find datapath_binding tunnel_key=2
_uuid               : 2d762d73-5ab9-4f43-a303-65a6046e41e7
external_ids        : {logical-switch="40ac144b-a32a-4202-bce2-3329f8f3e98f", name=network2}
load_balancers      : []
tunnel_key : 2- The logical input port (register 14) will be populated with the tunnel key of the child1 subport (load:0x1->NXM_NX_REG14[])
[root@central vagrant]# ovn-sbctl get port_binding child1 tunnel_key
1- Now the pipeline execution with the untagged packet gets resumed from table 8 (resubmit(,8)). Eventually it gets sent through the tunnel to worker2, where the parent (vm2) of the destination port (child2) is bound to.
Let’s inspect the traffic and flows on worker2, the destination hypervisor:
The traffic arrives untagged to br-int from the Geneve interface and later gets delivered to the vm2 interface tagged with the child2 VLAN ID (50).
[root@worker2 vagrant]# tcpdump -vvnee -i genev_sys_6081 icmp -c1
tcpdump: listening on genev_sys_6081, link-type EN10MB (Ethernet), capture size 262144 bytes
13:57:25.000587 40:44:00:00:00:03 > 40:44:00:00:00:04, ethertype IPv4 (0x0800), length 98: (tos 0x0, ttl 64, id 56431, offset 0, flags [DF], proto ICMP (1), length 84)
    192.168.1.13 > 192.168.1.14: ICMP echo request, id 10218, seq 31, length 64


[root@worker2 vagrant]# ip netns exec vm2 tcpdump -vvneei vm2 icmp -c1
tcpdump: listening on vm2, link-type EN10MB (Ethernet), capture size 262144 bytes
13:57:39.000617 40:44:00:00:00:03 > 40:44:00:00:00:04, ethertype 802.1Q (0x8100), length 102: vlan 50, p 0, ethertype IPv4, (tos 0x0, ttl 64, id 59701, offset 0, flags [DF], proto ICMP (1), length 84)
    192.168.1.13 > 192.168.1.14: ICMP echo request, id 10218, seq 45, length 64
The packet processing takes place as with any regular VIF but in the output stage, the traffic will be tagged before it is sent out to the vm2 interface:
[root@worker2 vagrant]# ovs-ofctl dump-flows br-int |grep mod_vlan_vid:50
 cookie=0x969b8a9d, duration=338995.147s, table=65, n_packets=263914, n_bytes=25814112, idle_age=0, hard_age=65534, priority=100,reg15=0x2,metadata=0x2 actions=mod_vlan_vid:50,output:4,strip_vlan

[root@worker2 vagrant]# ovs-ofctl show br-int | grep vm2
 4(vm2): addr:00:00:00:00:00:00
As you can see, the way that OVN implements this feature is very simple and only adds a couple of extra flows. Hope that this article helps understanding the details of trunk ports and how it’s leveraged by projects like Kuryr to run Kubernetes on top of OpenStack.