As a follow up from the last post, we are now going to deploy a 3 nodes OVN setup to demonstrate basic L2 communication across different hypervisors. This is the physical topology and how services are distributed:
- Central node: ovn-northd and ovsdb-servers (North and Southbound databases) as well as ovn-controller
- Worker1 / Worker2: ovn-controller connected to Central node Southbound ovsdb-server (TCP port 6642)
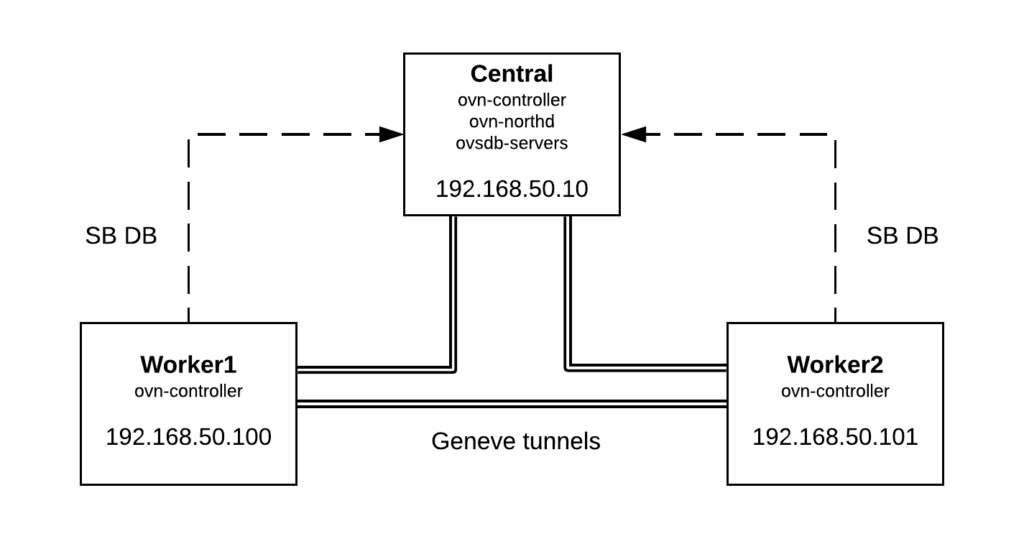
In order to deploy the 3 machines, I’m using Vagrant + libvirt and you can checkout the Vagrant files and scripts used from this link. After running ‘vagrant up’, we’ll have 3 nodes with OVS/OVN installed from sources and we should be able to log in to the central node and verify that OVN is up and running and Geneve tunnels have been established to both workers:
[vagrant@central ~]$ sudo ovs-vsctl show
f38658f5-4438-4917-8b51-3bb30146877a
    Bridge br-int
        fail_mode: secure
        Port br-int
            Interface br-int
                type: internal
        Port "ovn-worker-1"
            Interface "ovn-worker-1"
                type: geneve
                options: {csum="true", key=flow, remote_ip="192.168.50.101"}
        Port "ovn-worker-0"
            Interface "ovn-worker-0"
                type: geneve
                options: {csum="true", key=flow, remote_ip="192.168.50.100"}
    ovs_version: "2.11.90"
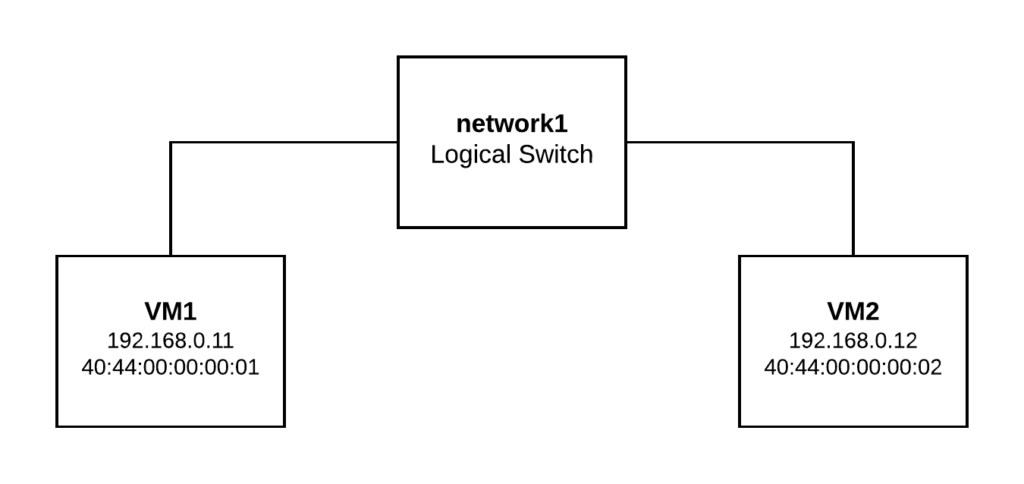
For demonstration purposes, we’re going to create a Logical Switch (network1) and two Logical Ports (vm1 and vm2). Then we’re going to bind VM1 to Worker1 and VM2 to Worker2. If everything works as expected, we would be able to communicate both Logical Ports through the overlay network formed between both workers nodes.
We can run the following commands on any node to create the logical topology (please, note that if we run them on Worker1 or Worker2, we need to specify the NB database location by running ovn-nbctl with “–db=tcp:192.168.50.10:6641” as 6641 is the default port for NB database):
ovn-nbctl ls-add network1
ovn-nbctl lsp-add network1 vm1
ovn-nbctl lsp-add network1 vm2
ovn-nbctl lsp-set-addresses vm1 "40:44:00:00:00:01 192.168.0.11"
ovn-nbctl lsp-set-addresses vm2 "40:44:00:00:00:02 192.168.0.12"
And now let’s check the Northbound and Southbound databases contents. As we didn’t bind any port to the workers yet, “ovn-sbctl show” command should only list the chassis (or hosts in OVN jargon):
[root@central ~]# ovn-nbctl show
switch a51334e8-f77d-4d85-b01a-e547220eb3ff (network1)
    port vm2
        addresses: ["40:44:00:00:00:02 192.168.0.12"]
    port vm1
        addresses: ["40:44:00:00:00:01 192.168.0.11"]

[root@central ~]# ovn-sbctl show
Chassis "worker2"
    hostname: "worker2"
    Encap geneve
        ip: "192.168.50.101"
        options: {csum="true"}
Chassis central
    hostname: central
    Encap geneve
        ip: "127.0.0.1"
        options: {csum="true"}
Chassis "worker1"
    hostname: "worker1"
    Encap geneve
        ip: "192.168.50.100"
        options: {csum="true"}
Now we’re going to bind VM1 to Worker1:
ovs-vsctl add-port br-int vm1 -- set Interface vm1 type=internal -- set Interface vm1 external_ids:iface-id=vm1
ip netns add vm1
ip link set vm1 netns vm1
ip netns exec vm1 ip link set vm1 address 40:44:00:00:00:01
ip netns exec vm1 ip addr add 192.168.0.11/24 dev vm1
ip netns exec vm1 ip link set vm1 up
And VM2 to Worker2:
ovs-vsctl add-port br-int vm2 -- set Interface vm2 type=internal -- set Interface vm2 external_ids:iface-id=vm2
ip netns add vm2
ip link set vm2 netns vm2
ip netns exec vm2 ip link set vm2 address 40:44:00:00:00:02
ip netns exec vm2 ip addr add 192.168.0.12/24 dev vm2
ip netns exec vm2 ip link set vm2 up
Checking again the Southbound database, we should see the port binding status:
[root@central ~]# ovn-sbctl show
Chassis "worker2"
    hostname: "worker2"
    Encap geneve
        ip: "192.168.50.101"
        options: {csum="true"}
    Port_Binding "vm2"
Chassis central
    hostname: central
    Encap geneve
        ip: "127.0.0.1"
        options: {csum="true"}
Chassis "worker1"
    hostname: "worker1"
    Encap geneve
        ip: "192.168.50.100"
        options: {csum="true"}
    Port_Binding "vm1"
Now let’s check connectivity between VM1 (Worker1) and VM2 (Worker2):
[root@worker1 ~]# ip netns exec vm1 ping 192.168.0.12 -c2
PING 192.168.0.12 (192.168.0.12) 56(84) bytes of data.
64 bytes from 192.168.0.12: icmp_seq=1 ttl=64 time=0.416 ms
64 bytes from 192.168.0.12: icmp_seq=2 ttl=64 time=0.307 ms

--- 192.168.0.12 ping statistics ---
2 packets transmitted, 2 received, 0% packet loss, time 1000ms
rtt min/avg/max/mdev = 0.307/0.361/0.416/0.057 ms


[root@worker2 ~]# ip netns exec vm2 ping 192.168.0.11 -c2
PING 192.168.0.11 (192.168.0.11) 56(84) bytes of data.
64 bytes from 192.168.0.11: icmp_seq=1 ttl=64 time=0.825 ms
64 bytes from 192.168.0.11: icmp_seq=2 ttl=64 time=0.275 ms

--- 192.168.0.11 ping statistics ---
2 packets transmitted, 2 received, 0% packet loss, time 1000ms
rtt min/avg/max/mdev = 0.275/0.550/0.825/0.275 ms
As both ports are located in different hypervisors, OVN is pushing the traffic via the overlay Geneve tunnel from Worker1 to Worker2. In the next post, we’ll analyze the Geneve encapsulation and how OVN uses its metadata internally.
For now, let’s ping from VM1 to VM2 and just capture traffic on the geneve interface on Worker2 to verify that ICMP packets are coming through the tunnel:
[root@worker2 ~]# tcpdump -i genev_sys_6081 -vvnn icmp
tcpdump: listening on genev_sys_6081, link-type EN10MB (Ethernet), capture size 262144 bytes
15:07:42.395318 IP (tos 0x0, ttl 64, id 45147, offset 0, flags [DF], proto ICMP (1), length 84)
    192.168.0.11 > 192.168.0.12: ICMP echo request, id 1251, seq 26, length 64
15:07:42.395383 IP (tos 0x0, ttl 64, id 39282, offset 0, flags [none], proto ICMP (1), length 84)
    192.168.0.12 > 192.168.0.11: ICMP echo reply, id 1251, seq 26, length 64
15:07:43.395221 IP (tos 0x0, ttl 64, id 45612, offset 0, flags [DF], proto ICMP (1), length 84)
    192.168.0.11 > 192.168.0.12: ICMP echo request, id 1251, seq 27, length 64
In coming posts we’ll cover Geneve encapsulation as well as OVN pipelines and L3 connectivity.